


Guide Handbook
Step-by-step guide to creating tours and setting up live guided tours
Quick Navigation
1 Creating a Route
A route is the foundation of your tour. You cannot create a tour without a route. There are two ways to create a route:
Method 1: GPS Tracker (recording while walking)
This method is suitable if you want to physically walk the route and record it.
-
Go to Personal Dashboard After logging in, open your guide dashboard
-
Open the "Route" tab In the dashboard navigation, select the "Route" tab
-
Enter route name In the "Route name" field, enter a unique name (in Latin characters or create a new one)
-
Click "Create Route" Route recording control buttons will appear
-
Click "Start" and begin moving GPS will automatically start recording your path with high accuracy
-
Mark key points At important places (landmarks, stops), press the "Marker" button
-
Complete recording At the end of the route, click "Stop" - the route will be saved automatically
Tip
Optimal movement speed: Walk at a normal pace. GPS records points automatically when your location changes with high accuracy (enableHighAccuracy: true).
Key points: Mark all places where tourists should stop to listen to information or view attractions.
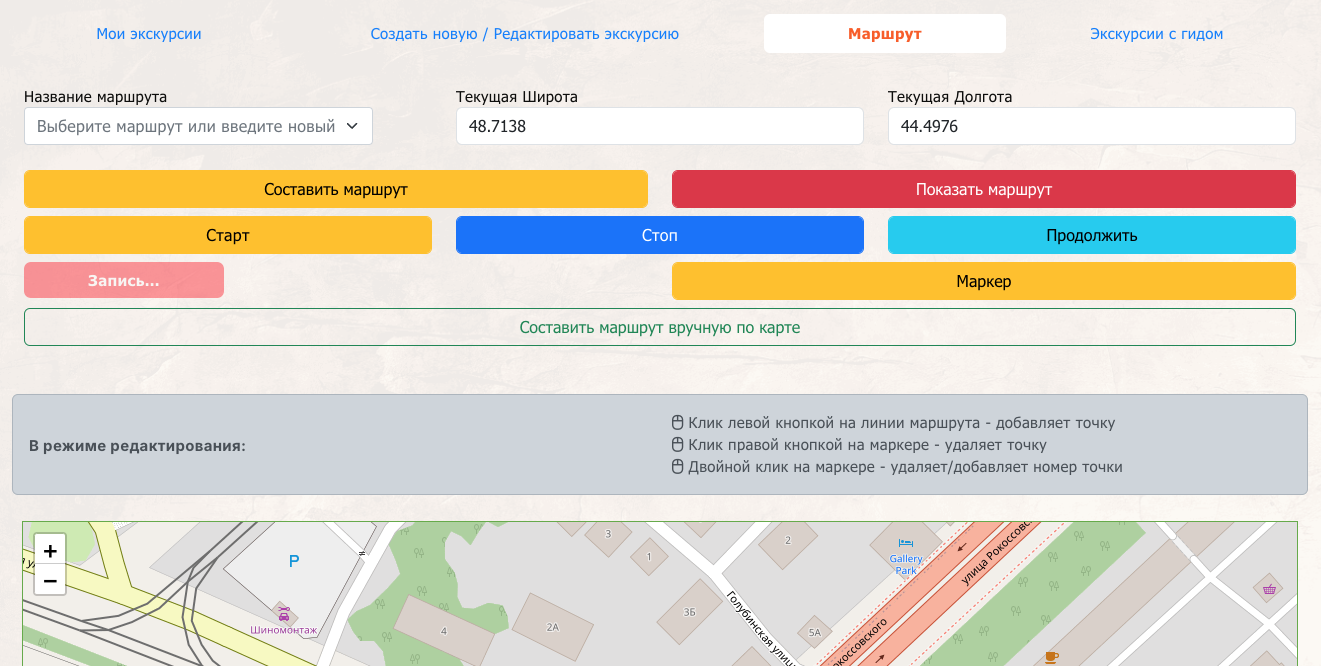
"Route" tab with Start/Stop/Marker buttons for GPS track recording
Method 2: Manual Map Creation
This method is suitable for remote route creation when you cannot physically walk it.
-
Open the "Route" tab In your dashboard, go to the "Route" tab
-
Enter route name Specify a unique name for the new route (in Latin characters)
-
Click "Create Route" After this, the "Create route manually on map" button will appear
-
Click "Create route manually on map" The map will enter edit mode
Important!
In manual creation mode, use special mouse actions to work with route points.
Left Click
Add a route point at the click location on the map
Right Click
Delete the selected route point
Double Click
Mark the point as a key point (a number will appear)
Dragging
Markers can be dragged with the mouse for adjustment
-
Create route points Click the left mouse button on the map to add route points
-
Mark key points Double-click on a marker to mark it as a key point (a number will appear)
-
Adjust as needed Drag markers or delete unnecessary ones with right-click
-
Complete creation Click "Finish route creation" - the route will be saved automatically
Tip
Optimal number of points: Create points at a reasonable distance from each other (every 50-100 meters for pedestrian routes).
Key points: Mark as key points only those places where there will be audio or text information for tourists.
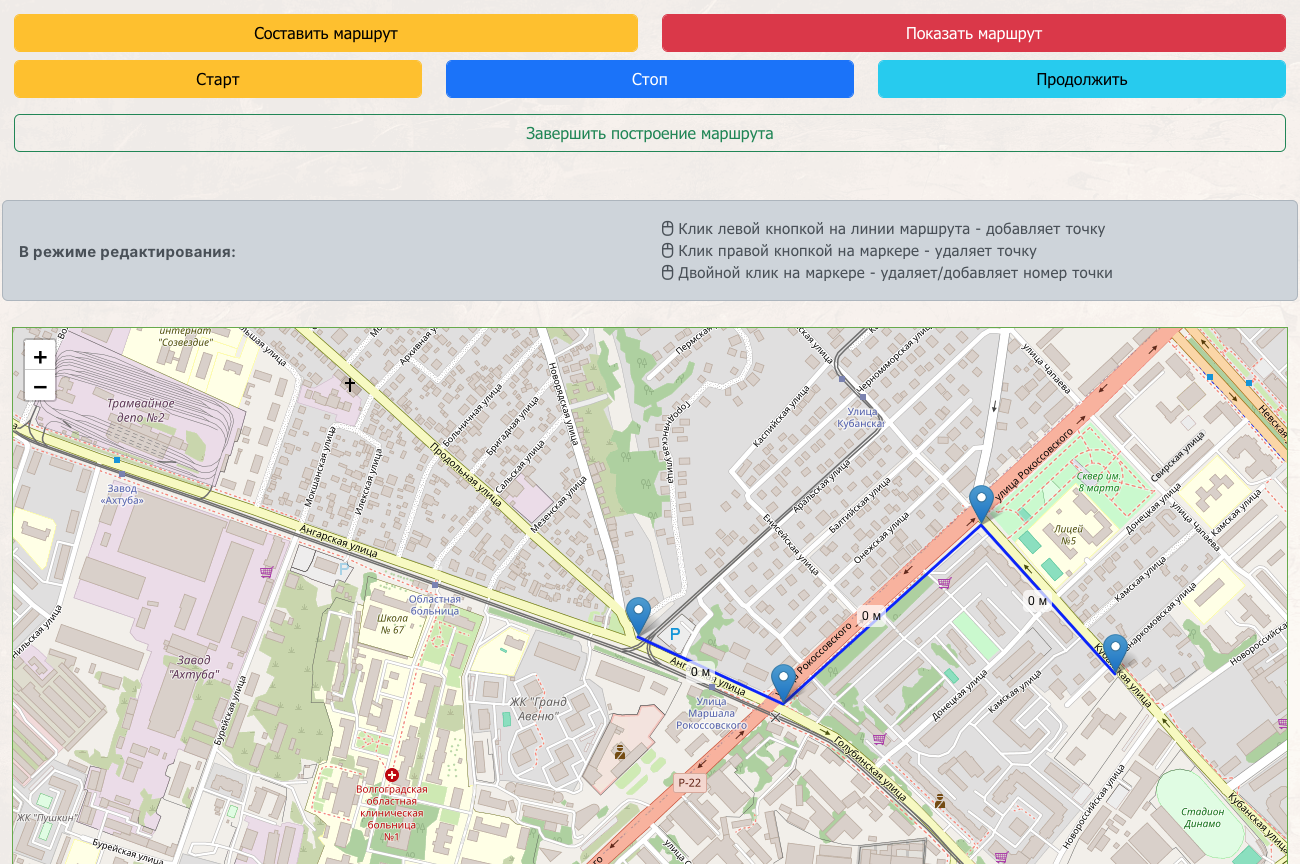
Map in manual creation mode with markers - click to add points
After creating the route
The route will be saved in your account and appear in the "My Routes" list. Now you can use it to create a tour.
Ready to Start Creating Tours?
Log in to your dashboard and start creating unique routes
Go to Dashboard2 Creating a Tour
After creating a route, you can proceed to create a tour. A tour is a route with additional information, descriptions, images, and pricing.
Important Requirement!
You cannot create a tour without a route! Make sure you have already created a route in Section 1.
-
Go to "Tour Creation/Editing" tab In your dashboard, open the second tab in the navigation
-
Select a route from the dropdown list All your created routes will appear in the "Select route" field. Choose the one you need.
Hint: You need to create a route for the tour first. If you don't see any routes, go to the "Route" tab and create one. Set stop points on the route.
-
Specify the city where the tour will take place Start typing the city name in the "City" field. The system will automatically suggest a city from the database.
Hint: Required field. Your geolocation city will be filled in by default.
-
Enter tour name Come up with an attractive and informative name (maximum 150 characters).
Examples of good names:
- "Historical Center of Moscow: from Kremlin to Arbat"
- "St. Petersburg Courtyards and Entrances: City Secrets"
- "Multinational Kazan: Tatar Quarter"
-
Set tour priority Specify a number from 1 to 10 (1 = high priority, 10 = low). Default is 1.
What is this for: Priority affects the display order of your tours in the list. Tours with priority 1 will be shown first.

Left column of the form: fields 1-4 (route selection, city, name and tour priority)
-
Write a brief description (maximum 300 characters) This description will be visible on the tour card in the catalog. Describe the essence of the tour briefly and concisely.
Tip Specify the main attractions, duration and features of the route. Example: "Walking tour of Moscow center visiting Red Square, GUM and Alexander Garden. Duration 2 hours."
-
Write a full description (maximum 2000 characters) Describe in detail what tourists will see, learn and visit during the tour.
Recommendations:
- List all key points of the route
- Specify interesting facts and stories
- Mention features (e.g.: "suitable for children", "accessible for people with reduced mobility")
- Add recommendations on clothing or season
-
Upload tour image Drag the file to the upload area or click to select a file.
Image requirements:
- Format: JPG or PNG
- Size: Square image 600x600 pixels
- Quality: Bright, clear photo of the main attraction
- Filename: Cyrillic names will be automatically transliterated
-
Set virtual tour price Specify the cost in rubles. Default is 990 rubles.
Important to understand!
This is the price for a tour with a virtual guide (self-guided tour by tourist with audio and text materials).
- Recommended price: from 300 to 900 rubles
- Default: 990 rubles (you can change)
- Calculation: cost is calculated automatically by the number of people
Price for tours with a live guide is configured separately on the "Tours with Guide" tab (see Section 3 of this guide). There you can set your own price per person for personally conducting the tour.
-
Click "Save and Continue" After saving, the tour will appear in your tour list, and you can configure key points.
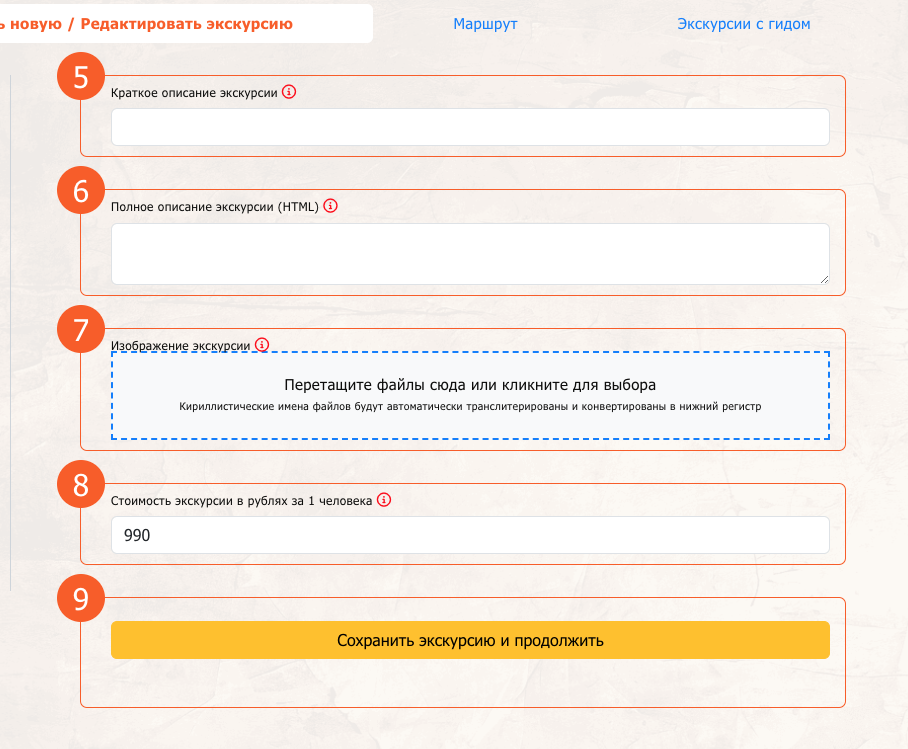
Right column of the form: fields 5-9 (brief description, full description, image, price and save button)
Configuring Route Key Points
After saving the tour, a "Key Points" section will appear where you can add information for each point of the route.
-
Find the "Key Points" section It will appear at the bottom of the page after saving the tour
-
For each key point add:
- Point name (e.g.: "Red Square", "St. Basil's Cathedral")
- Description (tour text) - insert the tour text that relates specifically to this point. This text will be automatically translated into all site languages and voiced using artificial intelligence to create an audio guide.
- Images (optional) - photos of the attraction
- Video (optional) - video for the tour point
-
Save changes After filling in all key points, don't forget to save the information
Recommendations for key points
- Quantity: Optimally 5-15 key points per tour
- Text style: Write in a lively language, as if telling a friend
- Content: The text should be interesting and not too long - when voiced, audio should not exceed 10 minutes per point
- Sequence: Points are numbered in the order of following the route
Working with Video for Key Points
You can add a video for any key point of the tour. Video will create a brighter impression and help tourists better immerse themselves in the atmosphere of the place.
How video works on the tour:
- Playback without sound: Video plays without sound during audio broadcast of the point text (voiced by AI)
- Picture-in-Picture mode: Video is displayed in a small window over the map
- First click on video: Map shrinks, video expands to full screen
- Second click: Sizes return back - video in window, map in full size
Tips for creating videos for points:
- Duration: Optimally 30-90 seconds per point
- Content: Show the object from different angles, architectural details, surroundings
- Quality: Shoot in good lighting, keep the camera stable
- Format: MP4, MOV or other standard video formats
- Playback without sound: You can shoot with or without sound - it will be muted during playback anyway
- Size: Try to optimize video (up to 50 MB per clip)
Standard mode
Video in small window, map in full screen
Click on video
Video expands, map shrinks
Repeat click
Return to original sizes
Ideas for video content:
- 🏛️ Panoramic shot of architectural monument
- 🚶 Walk along historical street
- 🌅 Beautiful sunset or sunrise at location
- 👥 Atmosphere of the place (people, movement, neighborhood life)
- 🔍 Details and decor elements up close
- 🎭 Street performances or events (if any)
After creating the tour
Your tour will appear in the catalog and will be available to tourists for self-guided tours (virtual guide). If you want to conduct tours personally, proceed to Section 3 - "Setting up a tour with a live guide".
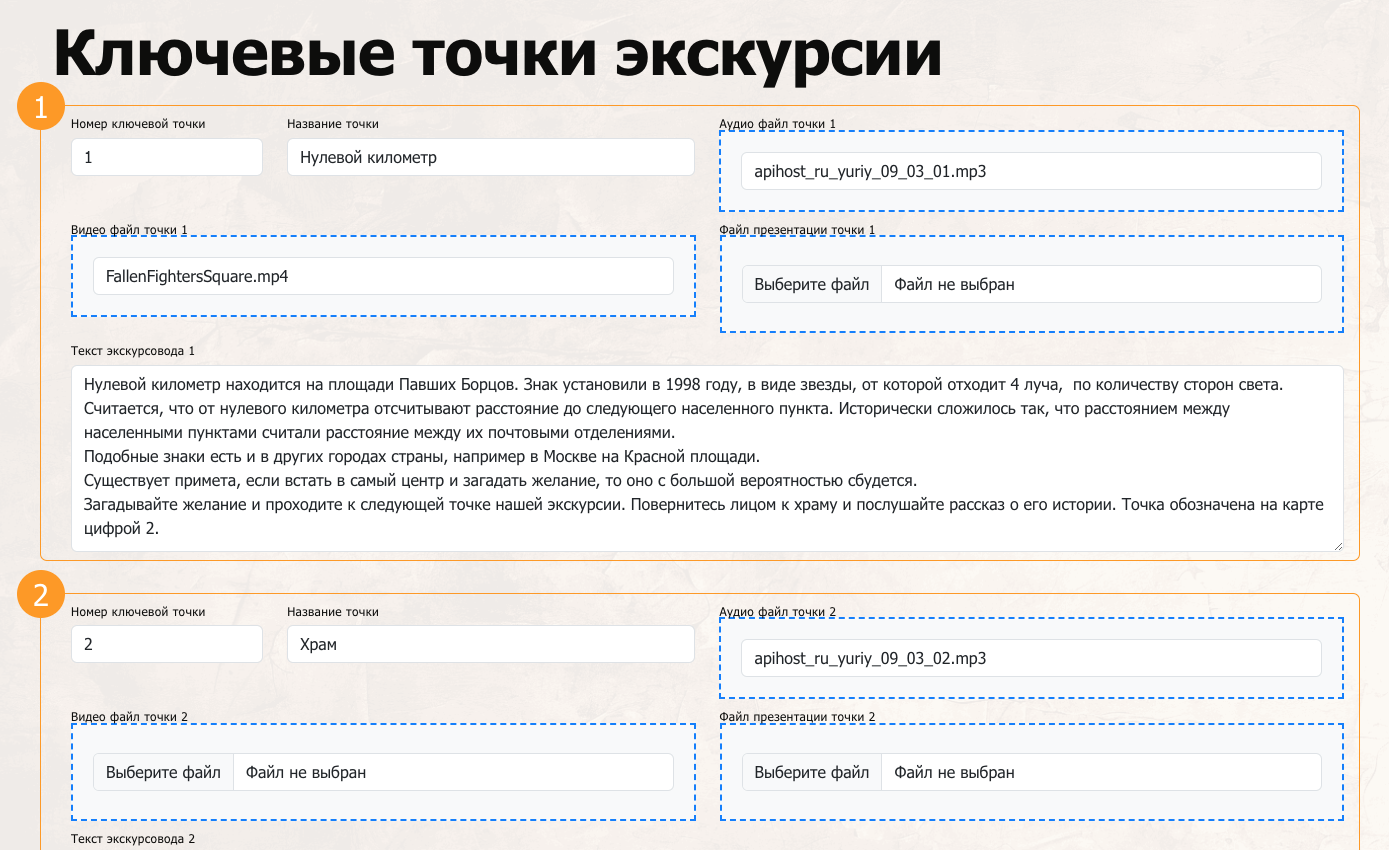
"Key Points" section - here you add name, description, images and video for each point
3 Live Guided Tour Setup
After creating a tour (Section 2), you can set up the option to conduct it personally as a live guide. This will open an additional income source and allow tourists to choose between a virtual tour and a tour with you.
What is the difference?
- Virtual tour (price from Section 2): Tourist walks the route independently with audio guide and text materials. Price usually 300-900 rubles.
- Tour with live guide (configured here): You personally conduct the tour for a group of tourists at the appointed time. Price is set by you.
-
Go to "Tours with Guide" tab In your dashboard, open the fourth tab in the navigation
-
Select a tour from "My Tours" list On the left side of the screen, click on the tour card for which you want to enable the live guide option
Hint: If you don't have any tours yet, return to Section 2 and create a tour.
-
Enable the "Enable tours with live guide" switch A settings form will appear on the right side. Activate the switch at the top of the form.
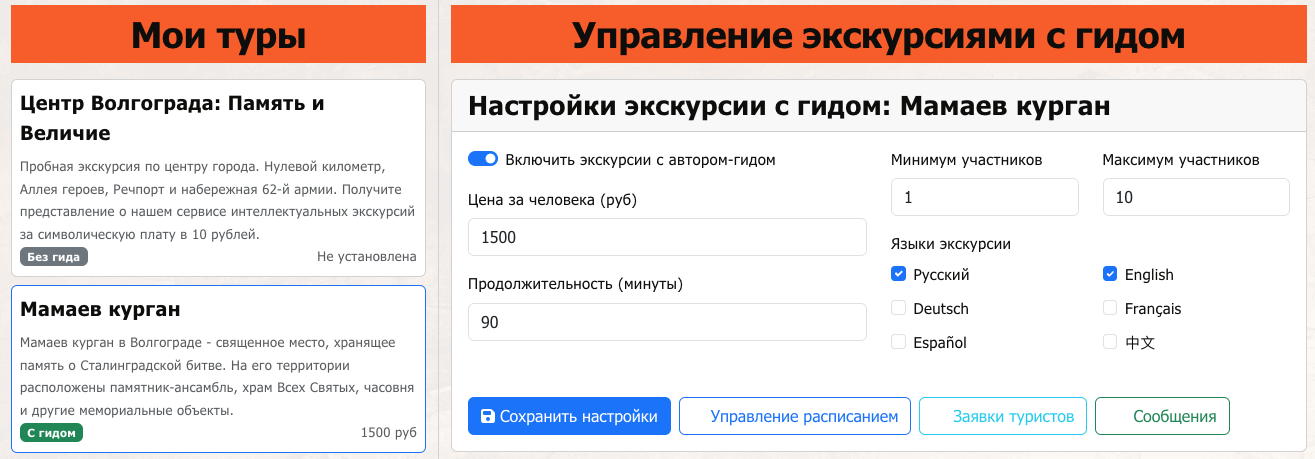
"Tours with Guide" tab - your tours list on the left and control panel on the right
Main Tour Parameters
-
Set price per person Specify the cost in rubles per tour participant.
Pricing recommendations:
- Overview tours: 500-1500 rub/person
- Thematic tours: 1000-2500 rub/person
- Exclusive routes: 2000-5000 rub/person
- Consider duration, complexity and uniqueness of the route
-
Specify tour duration Enter time in minutes (minimum 30 minutes, step 15 minutes).
Important! Specify realistic time considering all route points and time for narration. Better to add +15-30 minutes buffer.
-
Set minimum number of participants Specify the minimum number of people for the tour to take place (default 1).
Tip If you want to conduct only group tours, set minimum 3-5 people. For individual tours, leave 1.
-
Set maximum number of participants Specify the maximum number of people you can take on one tour (default 10).
Recommendations: For comfortable tour conducting, 8-15 people is optimal. Consider the route specifics and your capabilities.
Selection of Tour Languages
-
Select languages in which you can conduct the tour Check all languages you speak.
Available languages:
- 🇷🇺 Russian
- 🇬🇧 English
- 🇩🇪 Deutsch (German)
- 🇫🇷 Français (French)
- 🇪🇸 Español (Spanish)
- 🇨🇳 中文 (Chinese)
Important!
Choose only those languages in which you can confidently conduct the tour. Tourists will see available languages and choose based on this information.
-
Click "Save Settings" After saving, the tour will be available for booking with a live guide.
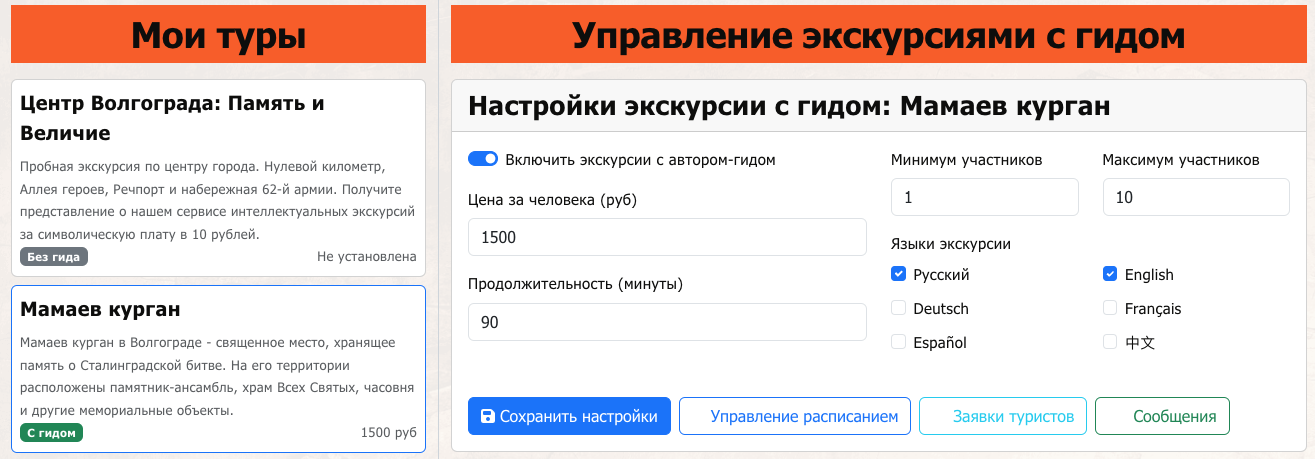
Tour settings form: switch, price per person, duration, participants and languages
Additional Tools
После сохранения настроек вам станут доступны дополнительные кнопки:
Управление расписанием
Настройте дни и время, когда вы можете проводить экскурсии
Заявки туристов
Просматривайте и обрабатывайте заявки от туристов на экскурсию
Сообщения
Общайтесь с туристами, отвечайте на вопросы
Статистика
Отслеживайте количество бронирований и доходы
Что дальше?
Следующий важный шаг: Настройте ваше расписание! Без расписания туристы не смогут забронировать экскурсию с вами. Подробнее об управлении расписанием и заявками читайте в Разделе 4.
4 Schedule and Bookings Management
After setting up live guided tour parameters (Section 3), you need to configure your schedule - specify days and times when you are ready to conduct tours. Without a schedule, tourists will not be able to book a tour with you.
Important!
Schedule is mandatory! Tourists see only those dates and times that you marked as available. If the schedule is not set up, the "Book with guide" button will be inactive.
Schedule Setup
There are two types of schedules:
Общее расписание гида
Отмечаете время когда вы заняты - эти слоты блокируются для ВСЕХ ваших экскурсий
Расписание конкретной экскурсии
Отмечаете занятые слоты только для выбранной экскурсии
-
Откройте раздел расписания Два способа:
- Способ 1: На главной вкладке ЛК нажмите "Управление расписанием" → откроется общее расписание
- Способ 2: На вкладке "Экскурсии с гидом" → выберите экскурсию → "Управление расписанием" → расписание для конкретной экскурсии
-
Изучите календарь Календарь показывает текущий месяц с временными слотами.
Временные слоты по умолчанию:
- 09:00 - утренний слот
- 11:00 - late morning slot
- 13:00 - lunch slot
- 15:00 - afternoon slot
- 17:00 - evening slot
- 19:00 - late evening slot
-
Отметьте занятые слоты Кликайте на временные слоты, чтобы отметить их как занятые (красные). Повторный клик снимает отметку.
Важно понимать логику:
- Серый слот = свободен, туристы МОГУТ забронировать
- Красный слот (occupied) = занят, туристы НЕ МОГУТ забронировать
- Голубой слот с названием тура = уже есть бронирование
- Прошедшие дни = неактивны, кликнуть нельзя
-
Используйте навигацию по месяцам Стрелки влево/вправо переключают месяцы. Настройте расписание на несколько месяцев вперед.
-
Сохраните расписание Нажмите кнопку "Сохранить расписание" внизу календаря.
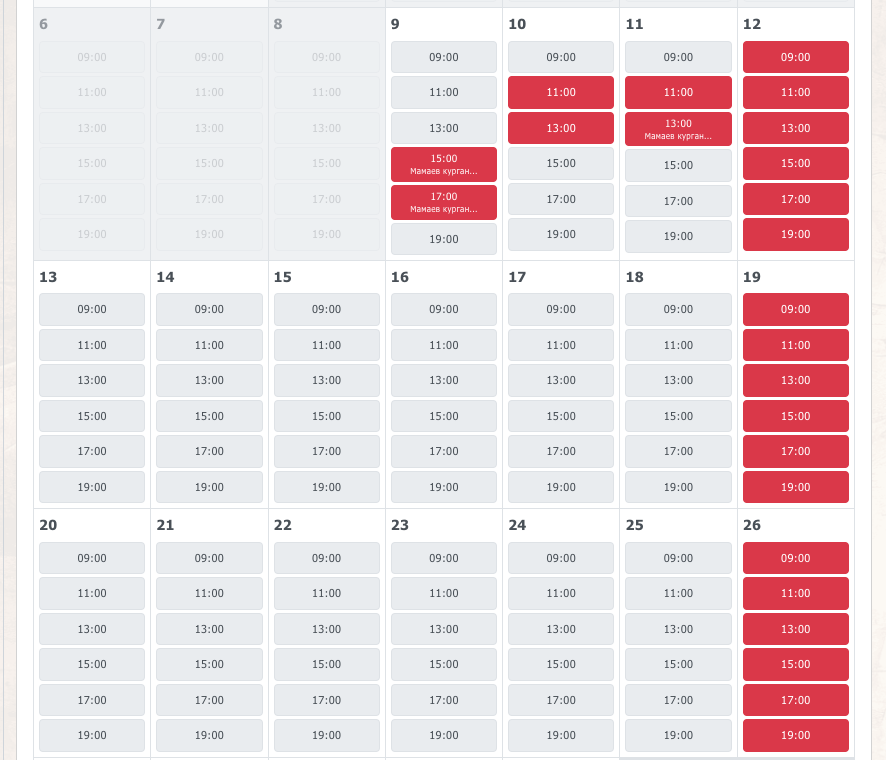
Schedule calendar with time slots - gray are free, red are occupied, blue are booked
Schedule Recommendations
- Планируйте заранее: Настройте расписание минимум на 2-3 месяца вперед
- Будьте реалистичны: Учитывайте время на дорогу между экскурсиями
- Оставляйте запас: Между экскурсиями закладывайте 1-2 часа на отдых
- Обновляйте регулярно: Проверяйте и обновляйте расписание раз в неделю
Работа с заявками туристов
After a tourist books a tour, you will receive a booking. It's important to process it promptly!
-
Получение уведомления о новой заявке При новой заявке появится красный бейдж с числом на кнопке "Заявки туристов"
-
Откройте список заявок Два способа:
- Главная вкладка → "Заявки туристов" (все заявки по всем экскурсиям)
- Вкладка "Экскурсии с гидом" → выберите экскурсию → "Заявки туристов" (заявки по конкретной экскурсии)
-
Изучите информацию о заявке Каждая заявка содержит:
- Имя туриста
- Дата и время экскурсии
- Количество участников
- Стоимость (общая и предоплата 25%)
- Контакты туриста (появятся после оплаты предоплаты)
- Сообщение от туриста (если есть)
Конфиденциальность
Контакты туриста скрыты до оплаты! После внесения предоплаты (25%) вы увидите email, телефон или мессенджер туриста для связи.
Pending
New booking, requires your decision
Confirmed
You confirmed the tour, tourist paid
Cancelled
Tour cancelled by you or tourist
Completed
Tour successfully conducted
-
Подтвердите или отмените заявку
- Подтвердить: Если вы готовы провести экскурсию в указанное время
- Отменить: Если по какой-то причине не можете провести (укажите причину туристу)
-
Свяжитесь с туристом После оплаты предоплаты используйте кнопку "Связаться" для уточнения деталей.
Available contact methods:
- 📱 Phone
- ✈️ Telegram
- 📞 Viber
-
После проведения экскурсии Отметьте заявку как "Завершено" - это важно для статистики и рейтинга.
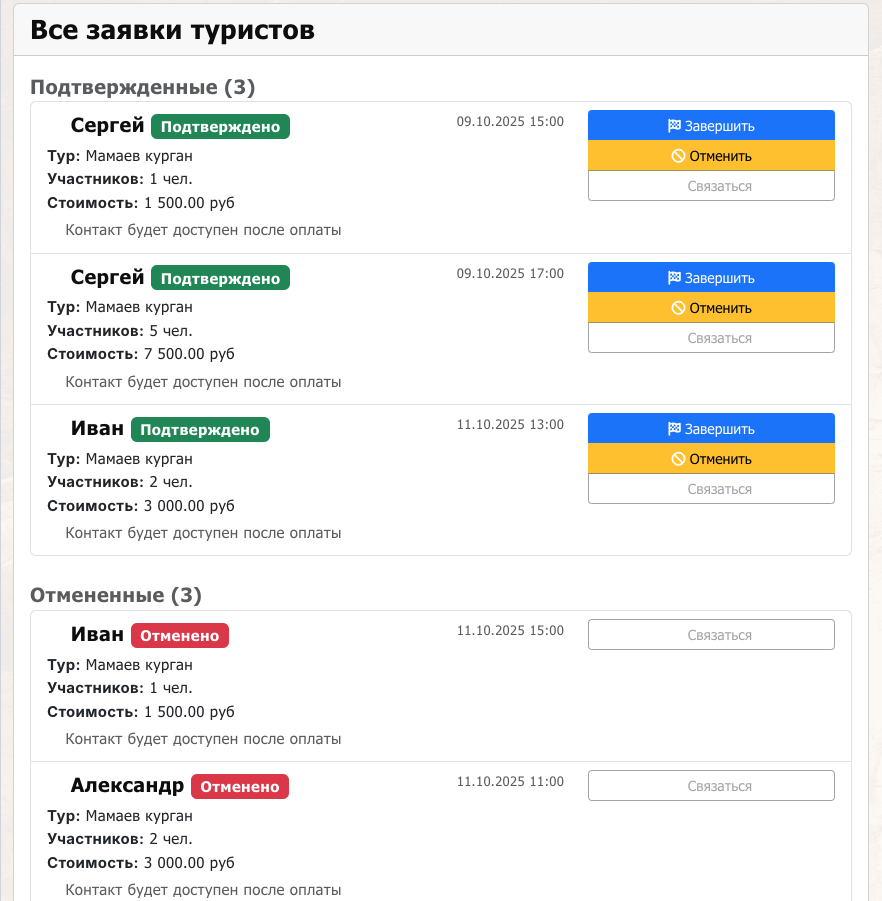
Bookings list with different statuses - pending, confirmed, cancelled, completed
Информация о бронировании в календаре
Если вы кликните на слот с бронированием (голубой) в календаре расписания, откроется модальное окно с подробной информацией:
-
Название экскурсии и время
-
Имя туриста
-
Статус оплаты
- ✅ Оплачено - контакты доступны
- 🔒 Ожидает оплаты - контакты скрыты
-
Кнопка "Написать туристу" Быстрый доступ к системе сообщений для общения с туристом
Tips for Successful Booking Management
- Быстрый ответ: Отвечайте на заявки в течение 2-4 часов - это повышает доверие
- Будьте на связи: Проверяйте заявки минимум 2 раза в день
- Качество сервиса: Подтверждайте детали за день до экскурсии
- Пунктуальность: Приходите на 10-15 минут раньше начала экскурсии
- Обратная связь: После экскурсии просите туристов оставить отзыв
- Статистика: Регулярно проверяйте раздел "Статистика" для анализа продаж
Congratulations!
Теперь вы знаете всё необходимое для создания экскурсий и работы с туристами. Начните с создания первого маршрута и превратите свои знания города в источник дохода!